WHEN THE LINKSYS SOLUTION FAILS: a step-by-step fix for the persistent problem of frequently resetting a Linksys 54G router.
Over the last few months my Linksys WRT54G router has been giving me trouble – namely, on a consistent but seemingly random basis, the router will no longer serve Internet data requests, while continuing to function normally as a local network router. In essence, none of the machines on my local network, whether using a wired or wireless connection could access the Internet, yet I could see and access all of my networked machines locally – both weird and annoying!
To make matters worse, if you go through the standard ‘troubleshooting’ technique of unplugging the power supply to the router, waiting a few seconds, and then plugging it back in… the problem remains unchanged. Ah yes, but are you using the latest firmware one might ask? As a matter of fact I am. The router in question is a Linksys WRT54G ver.4 router, with the latest firmware, Ver.4.21.1, dated 17 October 2005 (not exactly fresh).
Currently, the only way of ‘resolving’ the problem (though only temporarily), is to login to the router, access the Administration tab, and reset the device to Factory Defaults. Though as stated before, the problem simply comes back after a random period of time and usage. A more permanent solution was needed…
The next step of course was to search Google for other people that were having the same problem, and to see if they had come across any fixes or nuggets of information that might be useful. I did find quite a few people who were confronted with the same problem, all users of a variant of the WRT54G router, yet no one seemed to have a clue as to what was going on, or how to fix it. In fact, on the support forum at Linksys under the heading ‘WRT54G Need to Reset Regularly‘, the discussion (with no Linksys moderation assistance of course) quickly devolved into theories that the device was susceptible to bad electrical lines and needed to be isolated using a surge protector.
I’ve had quite a bit of experience working with and supporting computer equipment and peripherals, and that answer of needing a surge protector to reduce electrical line noise seemed pretty lame to me. In my case, I have a APC UPS and other APC power strips which protects all of my devices… there had to be another answer. My conclusion lead me to believe that it was an issue with the router’s firmware, which is software used by hardware, in this case, the router.
But what can you do if, like me, you’re already using the latest version of the Linksys firmware? Well, I hit the Internet again and found an open-source project called DD-WRT, which has been making firmware replacements for Linksys and other consumer and commercial routers. In my case it has worked beautifully, completed removed the issue of regularly resetting the router, and offers significantly more functionality – I highly recommend it.
The following is step-by-step instructions for replacing the standard Linksys firmware with the DD-WRT firmware on a Linksys WRT54G series router:
THE SOLUTION:
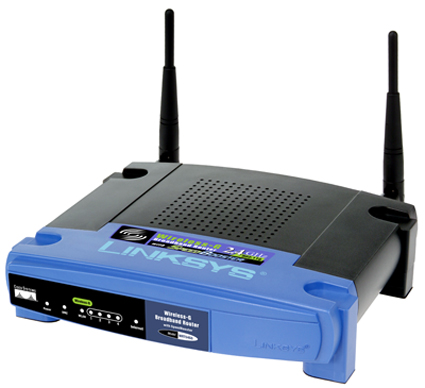
Step 1: We need to determine which Linksys router you are using, and if it is compatible with the DD-WRT firmware. First, to check whether or not you’re using a Linksys WRT54G router, you’re device should look very similar to the photo below.
Step 2: Next, we need to determine which particular model you have, as Linksys has produced many many versions, most of which work with DD-WRT, though there are a few exceptions (we’ll get to that in a minute). Follow the directions in the graphic below, you can click on the picture to view it at full-size. Essentially though, you want to turn the router upside-down, and note the model number and version displayed in the box highlighted below.

Now that you’ve had a chance to note the model and revision number, match it up with the list below of DD-WRT supported devices. If you’re WRT54G router isn’t on the list, or there is a note that the device is not supported, you can go to http://www.dd-wrt.com/dd-wrtv3/dd-wrt/hardware.html for a more complete and informative list, enter WRT54G in the router database, then press enter. Essentially though, if your router isn’t on the list, you’re out pretty much out of luck – sorry 😦
Below is the current list of DD-WRT firmware compatible Linksys WRT54G routers (supported unless otherwise noted):
- WRT54G v1.0
- WRT54G v1.1
- WRT54G v2.0
- WRT54G v2.2
- WRT54G v3.0
- WRT54G v3.1
- WRT54G v4.0
- WRT54G v5.0
- WRT54G v5.1
- WRT54G v6.0
- WRT54G v7.0 – not supported by DD-WRT
- WRT54G v7.2 – can only use DD-WRT micro firmware, see below *
- WRT54G v8.0 – can only use DD-WRT micro firmware, see below *
- WRT54G v8.2
- WRT54GL v1.0
- WRT54GL v1.1
- WRT54GS v1.0
- WRT54GS v1.1
- WRT54GS v2.0
- WRT54GS v2.1
- WRT54GS v3.0
- WRT54GS v4.0
- WRT54GS v5.0
- WRT54GS v5.1
- WRT54GS v6.0
- WRT54GS V7.0
- WRT54GS V7.2
- WRTSL54GS v1.0
- WRT54G-TM v1.1
- WRT54GC vx.x – not supported by DD-WRT
- WRT54GX2 vx.x – not supported by DD-WRT
- WRT54GP2 vx.x – not supported by DD-WRT
– – – - * The v24-SP1 generic micro firmware can be downloaded from here (right-click and save to an appropriate location), the file is a binary (.bin), is 1.67MB in size, and has a release date of 27 July 2008. After downloading the file, follow Steps 3 to 11 below, substituting the micro for the mini firmware, but do NOT go on to Step 12 for the installation of the standard firmware (both the mini and standard DD-WRT firmware releases are too large for your particular router, which has a 2MB limitation).
Step 3: If your router is supported, then the next step is to decide if you really want to attempt to flash your device with a third-party firmware or not? I’m not suggesting that there is anything wrong with the DD-WRT firmware binaries, only that this is a dangerous operation. If you choose the wrong binary or if you have a bad flash, you can permanently ‘brick’ your router – rendering it inoperable. The next steps also require a bit of technical wherewithall, as a result, this process isn’t for everyone.
I would recommend that you go ahead with the DD-WRT firmware upgrade if you’re fairly comfortable with computers and technology, and if you’re experiencing such trouble with your Linksys router that this is really the last best option. Just to be clear, in the event that something does go wrong, there is a good chance that you can fix the problem, but be prepared to go to your local electronics retailer and purchase a new router in case all is lost.
Step 4: We need to make sure that your router is currently running the latest official firmware from Linksys. This may seem like an odd thing to do considering that we’re going to reflash the device anyway, but with a few of the WRT54G revisions, they balked when trying to upgrade to DD-WRT from an out of date Linksys firmware (especially for the WRT54G v.1.0 models).
Important side note #1: Based on experience, there are specific browser limitations when using the Linksys web interface, especially when making changes. For instance, my main browsers tend to be Mozilla Firefox and Google Chrome, however I have had problems when trying to make changes in the router web interface when using Chrome. Therefore, I would recommend that you use Internet Explorer(at least for installing the DD-WRT firmware), then you can go back to whatever browser you prefer.
Important side note #2: When making changes to the router firmware, especially when flashing a new firmware, it is essential that you are on a computer which is directly attached to the router via an Ethernet cable, and NOT by wireless.
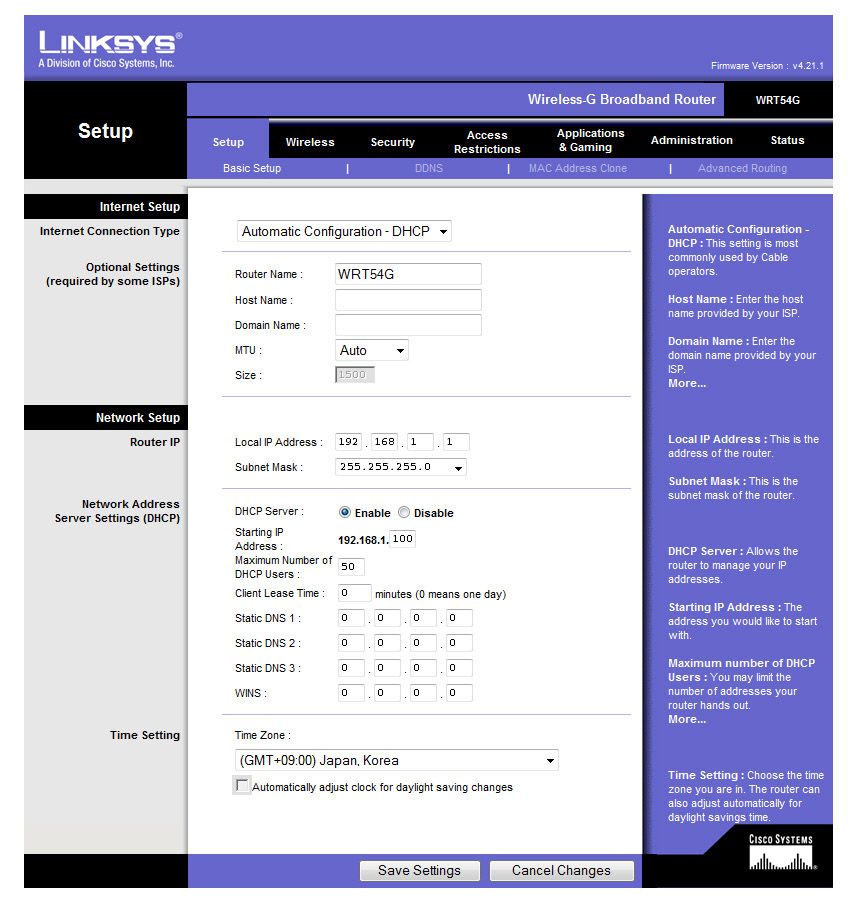
To get the latest firmware from Linksys, go to their WRT54G support homepage, and select your version number from the drop-down list. Check the firmware version number that appears on the download page for your router, and check that against what is listed on the top-right of router’s web interface. You can do that by typing 192.168.1.1 in your browser, if you haven’t changed the username and password (which you really should have), then the default username will be left blank, and the password will be ‘admin’.
Below is a screenshot of my router’s web interface, if you click on the picture it will open up to full-size, as you can see in the upper right-hand corner, it lists Firmware Version: v4.21.1 – which is current for the WRT54G v.4 router.
If your router’s firmware is not current, install the latest firmware from Linksys using their instructions, once you have done that we can proceed to Step 5.
Step 5: Make a note of all preferences and settings in the Linksys web interface, as we’ll need those when we flash the new firmware. Next, we need to log in to the Linksys web interface (using IE as mentioned before), click the ‘Administration’ tab…

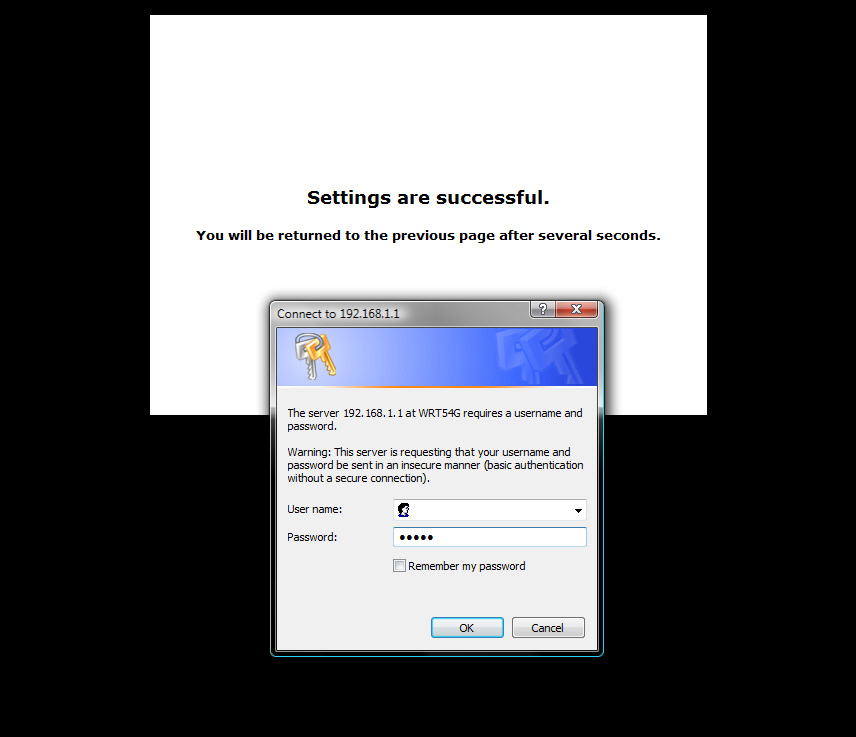
Click the Factory Defaults sub-tab, and select Yes for Restore Factory Defaults. Click Save Settings, at which point a warning will pop up, click ok.

The next screen will notify you that the changes to the settings have been successful (this is the page that cannot be displayed when using Chrome, making it impossible to successfully save changes with that browser).

Step 6: This is a very important step that will be repeated later on, but we need to also reset the router physically, using the reset button on the back of the device. This insures that the device has returned to a factory default setting. To do this we need to press and hold the reset button on the back of the router for 30 seconds with the device powered. This will clear the NVRAM, the configuration and reset the password to admin. Below is a diagram showing the rear of the router, and the location of the reset button. It is easiest to use a pen to hold the reset button, as it is not flush with the rear surface.

Step 7: After the router has been reset for 30 seconds using the reset button, you should be prompted with a Linksys login screen, remember the username and password have been reset to default (username: field left blank, and password: admin – as seen below.
Step 8: Next we’ll flash the firmware with the mini versionof the DD-WRT firmware. A couple of things to remember:
-
First make sure that under no circumstances you turn off your computer, close the web browser, or turn off the router during the firmware upgrade process – this could result in a bad flash, and potentially ruin your router.
-
Second, this step-by-step tutorial will be fairly static, meaning that it won’t be updated that often. As a result, the links to the DD-WRT binaries may change in the future, and they will certainly be updated in the future. Currently (08 March 2009), DD-WRT is using the v24-SP1 release… so in the future check that against the current release at the DD-WRT download page.
Assuming we’re logged in to the Linksys web interface, the next step is to download and flash the router with the mini version of the DD-WRT firmware. To download the mini generic version of DD-WRT v24-SP1, right click on this link, and save to an appropriate location. The file is a binary (.bin), is 2.8MB in size, and has a release date of 27 July 2008. Once you have downloaded the firmware, go to the Administration tab in the web interface, and click on the Firmware Upgrade sub-tab.

Once there, click on the browse button and locate the mini firmware version you just downloaded.

Click on the Upgrade button, the router will take a few minutes to upload the file, flash the firmware, and then restart the router.

An upgrade is successful screen will hopefully appear, click Continue to, umm, continue. I would also suggest waiting for about 30 seconds after the firmware upgrade has completed and you’ve clicked on the continue button… the router needs time to reset itself and become operational again.

Step 9:At this point the DD-WRT mini firmware has been successfully loaded and you should be prompted to login. The new firmware uses a new default username and password. The new username is root, the password again is admin.

Once you’ve logged in, you will be presented with the new DD-WRT web interface , which in many ways replicates the layout and functionality of the Linksys web interface, but goes much farther in terms of customisation and access to hidden settings.

Step 10: At this point we need to repeat step 4, in terms of setting the factory defaults in the firmware, then doing a hard reset by using the reset button on the back.
Navigate to the Administration tab in the web interface. Once there you may also want to select enable for Boot Wait and then click Apply Settingsat the bottom of the screen. Boot Wait will be automatically enabled later on, so its up to you. Essentially, Boot Wait introduces a short delay while booting (about 5 seconds). During this delay you can initiate the download of a new firmware if the one in the flash rom is not working. Obviously this is only necessary if you can no longer reflash using the web interface because the installed firmware will not boot.

Next, click the Factory Defaults sub-tab, and select Yes for Restore Factory Defaults. Click Save Settings, at which point a warning will pop up, click ok.

You will then be presented with a notification that says Processing, please wait – after it has completed processing, you will need to following the instructions for doing a hard reset but holding down the reset button the back of the router for 30 seconds.

Step 11: After resetting the router after loading the mini firmware and clearing the NVRAM with the hard reset, the router wasn’t immediately accessible. It took about 30 seconds for it to become operational before I was able to access the web interface again. When you return you’ll find the DD-WRT router management screen, at this point you are required to change the default username and password before moving on. As note before, Boot Wait is enabled by default now.

Step 12:At this point we have our router running the mini version of the DD-WRT firmware. As mentioned before, the main reason we did that is because some of the older WRT54G routers have difficulty in transferring immediately to the standard DD-WRT firmware. From what I gather is has something to do with the firmware file size, where the old Linksys firmware would reject new firmwares over 3.0MB.
We are now at another crossroads… you don’t have to go on and upgrade to the standard version of DD-WRT, but if you’re into the technical side of computers, you enjoy tweaking settings, and generally getting into trouble – then you’ll probably want to use the standard version.
Assuming we’re logged in to the Linksys web interface with the new username and password, the next step is to download and flash the router with the standard generic version of the DD-WRT firmware. To download the standard version of DD-WRT v24-SP1, right click on this link, and save to an appropriate location. The file is a binary (.bin), is 3.6MB in size, and has a release date of 27 July 2008. Once you have downloaded the firmware, go to the Administration tab in the web interface, and click on the Firmware Upgrade sub-tab.

Once there, click on the browse button and locate the standard firmware version you just downloaded. There is also an option next to the drop-down box that says After flashing, reset to – that can be left at the default, which is Don’t reset.

Click on the Upgrade button, the router will take a few minutes to upload the file, flash the firmware. It begins at 300 seconds, though it probably only took about 40 seconds.

An upgrade successful screen will hopefully appear, the device will then restart itself. Again, I would suggest waiting for about 30 seconds after the firmware upgrade has completed… as the router needs time to reset itself and become operational again.

Step 13: We’re essentially done… all that is left to do is reset any optional settings, IP settings, DHCP settings, and time settings. The Wireless settings need to be reset as well, which is under the standard Wireless tab. In the DD-WRT web interface, any time a change is made, click Apply, or Save then Apply if you’re extra cautious.
All in all, the DD-WRT firmware is a bit more advanced than the standard Linksys firmware, but all of the same functionality is still there, and for the most part the graphical and logical layout is the same as well. If you have questions as to what specific setting means, or what they do, you can click on the Help link on the right hand side of the web interface.
A few additional resources you may find useful:
- The official Linksys WRT54G support page, including firmware downloads
- The WRT54G/GL/GS/GX page at DD-WRT
- The DD-WRT download page
- The DD-WRT installation help page
Hope that helped and がんばってね!
Barugon (^_^)
– – – – – –
Have you found the information or instructions on this site helpful? If you would like to donate to Barugon, please feel free to do so… though I’m always happy to help for free too (^_^)


Leave a comment